// //

Remove "Powered By Blogger" Attribution from blogger mobile template | Art2advice


For a beginner, its hard to find an option to remove "Powered by Blogger" text at the bottom of mobile version of blogger blog .(at first,me too), then gradually after learning the blog's layout and core concepts, i found it is easy as anything to remove whatever we need to remove,

So i came up with this article where you can learn how to remove "Powered By blogger" from mobile versions. Keep reading.

Before you experiment with this, i suggest you to backup your template. So, if something go wrong, you can rollback the changes.

Go to template section of your blog.

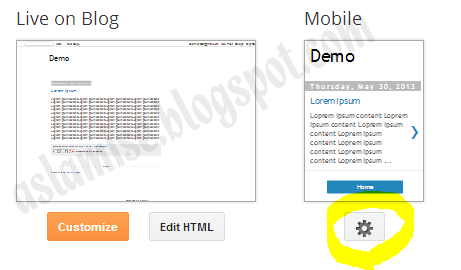
There you can see a mobile version

Click on the configure icon below mobile template.


A box will appear titled as Template> Choose mobile template.

There , below on "on mobile devices ,show a mobile version of your current template"

you can see 2 options .
Select the first on "Yes, Show mobile template on mobile devices.".
And below, that Choose mobile template, as "CUSTOM" From dropdown.

and click on save.

Step 2:

Open template editor

Search for "Attribute" in template.


you will see  aline like this.
<b:widget id='Attribution1' locked='true' title='' type='Attribution'>
Change locked='false'

<b:widget id='Attribution1' locked='true' title='' type='Attribution'>TO
<b:widget id='Attribution1' locked='false' title='' type='Attribution'>

And
Change the parent section's showaddelement='yes'

<b:section class='foot' id='footer-3' showaddelement='no'>to
<b:section class='foot' id='footer-3' showaddelement='yes'>

Save your template for once. (Important).

After saving once, search again for "Attribution" in template, and delete below part from your template.

<b:widget id='Attribution1' locked='true' title='' type='Attribution'>
<b:includable id='main'>
<b:if cond='data:feedbackSurveyLink'>
<div class='mobile-survey-link' style='text-align: center;'>
<data:feedbackSurveyLink/>
</div>
</b:if>
<div class='widget-content' style='text-align: center;'>
<b:if cond='data:attribution != &quot;&quot;'>
<data:attribution/>
</b:if>
</div>
<b:include name='quickedit'/>
</b:includable>
</b:widget>


Resulting page will look like,


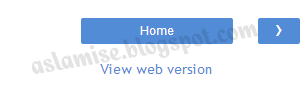
Save your template, Visit your blogs mobile version , if you see "Powered By Blogger"  removed from blog's mobile version, feel free to share that news here in below in comments.
If you face any problem applying this, Start a discussion.
Read More
// //

How to backup blogger template? | Art2advice

To backup your blogger template,

Go to blogger dashboard

Select blog to edit template

You can see template option on the left side of blogger dashboard window.

select it

It will show two thumbnails of your blog, one is the appearnce in web, and another for mobile.
next to that, on top right corner, you can see a button labeled "backup/restore" like this.


Click on that
it will popup a box that looks like below

Click on download template button
you are done.
your current blogger layout template code is backed up now. it will be downloaded to your downloads folder in .xml file format.

Restoring bloogger template .Xml file


If you fail anytime while you edit your blogger template codes, try restoring the .xml template file to server.
to do so, repeat above steps until it pops up the download template button containing box.
just below that button, you can see a choose file button.


click on that, browse for previously downloaded template.

After selection, it will be uploaded to server and page will automatically refreshed saying that the neww template has been applied.

Thats all you have just learned how to backup or restore the blogger template in easy steps.
Read More
// //

The Best Torrent Downloading Software (2014) | Art2advice

Here they are: the most popular 'music pirate' downloading software for torrent file sharing. This list is compiled from hundreds of user comments and reader suggestions. Currently, the two most popular tools are uTorrent and Tixati. But definitely look at all the choices below for yourself.

1. uTorrent

Known as both "u-torrent" and "micro torrent", this is the most popular torrent tool today. uTorrent has all the functions a torrent downloader will ever need, and it only requires 1 MB of hard drive space and memory. uTorrent has all the downloading and seeding performance of its competitors, but with minimal impact to the rest of your computer's speed.

2. Tixati

Tixati is a slick and fast torrent program authored by the architect of the WinMiX OpenNap program.  Definitely a sophisticated and forward-thinking client, Tixati is already embracing the shift towards trackerless torrent swarming:  magnet links, PEX, and DHT swarming works very well in Tixati.  The throttling features and wide range of priority adjustments will make any fussy P2P user quite happy, and you'll find that download speeds are at least as fast as Vuze and uTorrent.  The bitfield graphs and 'executive dashboard' display is very professional, and this product easily earns itself a spot amongst the best torrent clients today.  Definitely try Tixati for torrent P2P needs.

3. Vuze (formerly 'Azureus')

You can call it 'bloatware', or you can call it 'the Lexus of torrent software': Vuze is a large software product that offers a smorgasbord of features (most of which you may never use). You can play any media in Vuze, including HD videos. You can play music, and run most any media in this product. Apparently, you can also use Vuze to run media on your iPhone, Xbox, or PSP. Vuze is very popular, and you'll want to give Vuze a try for a couple days and decide for yourself if this powerful product fits your style of downloading and viewing media.

4. ABC (Another Bittorrent Client)

This product is quite plain looking. But don't let the appearance fool you: this product is solid, and offers good functionality. You can easily configure the display to show stats/seeds/trackers. You can easily pause and queue any torrent at any time. You can also set timers on your upload options (very nice for serious P2P users). And the product is written in the lean Python/wxPython code languages.

5. Transmission Bittorrent

Mac users and Linux users: this product is for you. Tranmission is a lean product that allegedly uses the smallest memory footprint of any torrent client today. It's open source, clean-looking, and a favorite amongst Mac users. Give Transmission a try if you are an Apple or Linux user.

6. BitComet

This free software is very good, but has lost many users to uTorrent, Transmission, Vuze, and Tixati.  If you are a serious downloader who has particular tastes in interfaces, definitely give BitComet a try.  If you are a new user, start with uTorrent or Vuze first. Note that many private torrent sites will ban you for using BitComet, as there is a pervasive belief that BitComet reports incorrect ratio information, and also leaks data to DHT.

7. TurboBT

TurboBT is a product that is published in multiple human languages, including: Mandarin, Romanian, German, Portuguese, Russian, and French. TurboBT is free to download and use, and has been recommended as a solid Python-based P2P product.

8. Deluge Torrent

Linux and OS X people: rejoice! Here is a software that is very friendly towards your operating systems, and many About.com readers say good things about this product. It has a clean metallic-but-soft interface design, and most any statistic and metric you might ever want to see about your uploads and downloads. Like most torrent clients, the product is free, and built/supported by programming enthusiasts who truly believe in file sharing.
Read More
// //

Tricks to increase BSNL Broadband Speed | Art2advice

BSNL Internet is most popular Broadband connection service provider in India. They offer high speed internet for a very low cost. But still many people out there hate the  connection speed what they get in their dataone connection . And also even i use the  BSNL Broadband connection .So here are some tips on how to improve your internet connection speed.

1. Change the BSNL DNS servers:
BSNL broadband users will mostly be faced with many DNS issues. The DNS servers take longer time to respond due to the bad connection and crowded connections in your local DNS.Hence the BSNL users can use this hack to increase their speed. Instead of using the BSNL DNS servers ,which are slow and unreliable ,you can use the third party DNS servers .Or the easiest option is to use the open DNS. You can follow the methods given below to configure your network to use the DNS servers specified below.

OpenDNS free DNS server list:

  • 208.67.222.222

  • 208.67.220.220

DNSadvantage free DNS server list:

  • 156.154.70.1

  • 156.154.71.1

Public Name server IP address:

  • 209.244.0.3

  • 209.244.0.4

Scrubit public DNS server address:

  • 67.138.54.100

  • 207.225.209.66


You will be able to see some considerable improvements in your Broadband speed after you have configured the above DNS . Go to your dataone connection in network connections ->right click->Properties-Networking tab->TCP/IP properties and there manually enter in any of the above DNS. These also features with phishing filters and automatic URL correction and provide greater security and speed.You can also use these even if your DNS servers are working fine to increase your connection speed.

2. Using TCP Optimizer Software:
I personally use a software called  TCPOptimizer which automatically optimizes your internet settings for optimal performance of the internet speed.

3. Free Cache space:
The cache space reduction can also increase your speed of your internet.Here are the steps:
Firefox settings: Go to Tools ->Options ->Advanced ->Network ,and change  the value of cache space to 50.
For Internet Explorer : Tools -> Internet Options -> General->temporary internet files, and set disk space value to 50.

4. Upgrade your Tariff Plan
Even after these steps if you didn’t notice much significant increase, then the final alternative is to upgrade your plan. Usually the plans like 500C,650UL ,750UL,950UL etc etc all have a download cap to reduce your speed once it crosses the download mark. So try to go for a higher plan to get better speed and have a peace of mind ..:P..:D.
 If you know any tricks of speeding up your bsnl broadband connection, then let us know and we will honor your comments..:D.Cheers
Read More
// //

How To Open Banned Websites WIth Proxy Sites ? | Art2advice

                                Open Banned Websites WIth Proxy Sites

There are many sites which are blocked by government because of breaking laws of their country. The user downloads many softwares to open these sites but end up being infected by  malware, virus. Today i will share a trick with you guys which can help you easily open these banned sites without downloading anything. As you know that there are many online proxies but everyone need a proxy server which is faster and trusted. Here in this post I am revealing an online proxy and a tutorial to open banned sites with the help of these online proxies which is trusted and fast. Just follow my step to open banned sites.

How To Open Banned Site ?


1. Open www.incloak.com in your browser.


You can also use any proxy site from list below :

List Of Top Proxy Sites


http://aniscartujo.com/webproxy
http://www.badboysproxy.com
http://www.surfscreened.com
http://www.hagiomusic.info
http://www.greenpips.info
http://urlbrowse.com
http://www.hideipaddress.net
http://www.sneakfilter.com
http://www.browsestealth.com
http://www.sneak1.info
http://proxiesrus.com
http://www.surfindark.com
http://www.navydog.com
http://falsario.com
http://www.proxypit.com
http://www.proxypan.com
http://myspacewebproxy.org/
http://www.allfreehere.info
http://www.takefreely.info
http://autobypass.com
http://www.proxcity.info
http://www.proxyzip.org
http://www.cheekyproxy.com
http://www.eggproxy.com
http://www.theschoolcloak.com
http://www.hidemefast.com
http://browseanywhere.info
http://www.404surf.com
http://www.cloakip.net
http://www.browsedark.com
http://www.dartprox.com
http://www.proxish.com
http://www.surfsneak.com
http://www.surfsneaky.com
http://www.browsehidden.com
http://www.filterhide.com
http://www.browsesneak.com
http://myspaceproxyy.com
http://www.browsesneaky.com
http://www.proxyz.us
http://www.sneakschool.com
http://www.iphide.com
http://www.proogle.info
http://greatproxy.info
http://www.playnsurf.info
http://www.realproxy.info
http://aplusproxy.com
http://www.ecoproxy.com
http://freedom.webtuo.com
http://www.slyuser.com/
http://tenpass.com
http://pawxy.com
http://pawxy.org
http://logu.in


2. After that enter the URL of the site which you want to open like below.
Open Banned Websites WIth Proxy Sites
3. Now click the Hide Me button and enjoy.
Read More
// //

Learn To Hide Files Behind The Images | Art2advice

                                             hide files behind images


There are some important files or document you want to hide from others on your computer. To do that you might be creating folder inside folder to hide such files but in todays tutorial i will change this by teaching you a interesting trick to hide files behind images.To hide a file behind a image means that if any one opens that image he will see the image, but to see the hidden file we need to open that image in a specific way. So lets get started.

How To Hide File Behind Image ?


In order to do this you should have basic understanding of command line, but if you don't know check out  tutorial given below :


1. Select an image to be used for hiding file behind the image.
2. Now select a file to hide behind the image and make it in .RAR format. With the help of the WinRAR.
3. And most important is that paste both the files on desktop. You may do this anywhere instead of desktop if you have some basic understanding of command line.
4. Now open cmd by going to Start > Accessories Command Prompt and type following commands in it.
cd desktop
hide files behind images

5. CD stands for change directory by typing above command you change your directory to desktop. After that type command given below.
 Copy /b imagename.jpg + filename.rar finalimage.jpg
hide files behind images
  • Replace imagename.jpg with the name of image you want your file to be hidden behind. Don't forget to add image format (Eg: .jpg,.png,.gif)
  • Replace filename with name of your file you want to hide. It must be in .rar format.
  • Finally Replace finalimage.jpg with whatever name you want your final image with hidden files should be. This is the image where your file will be hidden.
6. Now when you will try to open this newly created image it will open as normal image, but to open you hidden file you need follow steps given below.

How To Access Hidden File ?


To access your hidden file you need to open the newly created image in winrar. Just follow simple steps given below to do that.

    1. Open winrar
    2. Now locate your image and open it or simply drag your image in winrar.
    3. Extract the file and done.
Read More
// //

How to Translate Blog Automatically in Visitor's Language? | Art2advice

Using new technology and adopting it is good, specially on your blog for your readers. If you are using responsive template for your blog than it is good. That means that your blog  can be accessed by the various number of device such as PC, Mobiles, Tablets etc. Just adopting responsive template for your blog is not enough, you much do Mobile SEO for your blog as well.

Language Translation

You might think now what else is left to be make your site well optimized for various terms of Internet. I must say that If your template is responsive and you also done Mobile SEO for your site and even your using redirection for your site for mobile user than you are at good. But did you think what about those visitors who visits your site from non-English countries? Yes of-course English is most spoken language in the world but we cannot forgot those major spoken languages like Spanish, Italian and many more. What if your visitors coming from this countries and don't know the English? Will they stay on your site? Will they return to your site? The answer will be NO.


Today we can't afford even a single visitor lost. So here I came with another tool that will bring more visitors to your site and will make them stick to it. Yes I am talking about translate your blog automatically. Today I am posting how you can make your blog to identify the user's native language and translate your English content to it.

So let's headed to the tutorial.

INSTALL GOOGLE TRANSLATE TOOLBAR

Step 1: Go to Google Translate Tool site.

Step 2: Login with your Google account.

Step 3: Enter your blog URL in box asking to enter website URL.

Step 4: Now choose your site's default language.

Step 5: Click on "Next" button.

Google Translate Tool

Step 6: Now select the "All languages".

Step 7: "Display Mode" should be "automatically" as we want to translate our blog automatically.

Translate Tool1

Step 8: Click the checkbox display as below screenshot.

Translate Tool

Step 9: Enter your Analytics Id to track the visits. (not necessary).

Step 10: Click on "Get Code" button.

Step 11: Now open new tab and login to your blogger dashboard.

Step 12: Go to Template >> HTML Editor.

Step 13: Find </head> and paste the first snippet code just above the </head> tag.

Step 14: Now copy the second snippet code and paste where you want translate widget to appear.

Translate Code

Step 15: Now save your template.

That's it! You have successfully installed Google Translate tool on your blog. Now whenever visitors comes from non English countries using google search, your blog automatically translate to his language.
Read More
// //

How To Get USA and Canada Traffic To Blog | Art2advice

           Get USA and Canada Traffic

As everyone wants to get filled their pockets with online earned money, internet users are now turning into bloggers! The reason why everyone is choosing blogging because it's best way to make money online as recently I also wrote about that why blogging is best method to make money online. Well, blog can be created easily in seconds but driving traffic is the matter!

Even some people also get high traffic through different methods but unfortunately that traffic is not profitable. Profitable means that traffic is not valuable for generating money. Valuable traffic depends on the country from which we're getting the highest traffic. If that country is poor in reality than chances are low to make enough money but if the country is very rich than you can also be rich! United States, United Kingdom and Canada seems to be rich countries so many bloggers try to get targeted traffic from these so that they may earn high. Today, we're going to learn that how can we get traffic USA and Canada traffic to blog.


Tip 1. Target Keywords For USA and Canada Locations

The first and very best tip is that we should target some keywords that are highly searched in USA, UK and Canada. First we'll need to do keyword research and also need to select locations "USA, UK and Canada". If any keyword is having high searches and it also has high CPC than target that keyword with closed eyes. Try to create quality and unique content on that keyword and also do proper on-page optimization so that your keyword should rank well in SERP. Put keyword in post title, permalink, meta description, H2 headings, content with 2-4% keyword density and image optimization. Once you've published that post than also create some backlinks and set anchor text same as your keyword. Don't do spam in link building it can do negative effect. If you succeeded in getting first position on that keyword than no one can stop you from getting US and Canada traffic.

Tip 2. Social Promotion in US and Canada Communities

Social promotion has always been helped bloggers to drive traffic and it is completely easy! The thing there we need to do is just sharing blog posts but sharing posts with technical ways can help to get more traffic. Well, There are many social networking sites such as Facebook, Google+, Pinterest, LinkedIn etc that you maybe using already. In order to drive US and Canada traffic with use of social sites, you'll need to join some communities or groups in which there we should be US and Canadian people. Also try to find the relevant communities with your niche or posts so that you may get proper profit and don't join such communities that don't allow to share links. Once, you've got some communities than easily share your blog posts in those communities but try to do not break community rules.

Tip 3. Engage With US and Canada Blogs With Same Niche

So, This is the third tip that you're going to get! Here you've to engage with some blogs same in your niche and those blogs must belong from US and Canada. Engaging with other blogs means reading out their posts, commenting on them, making discussions with blog readers and owner and also sharing each others ideas. There is another thing that you can do to get US and Canada traffic. If those blogs belongs from US and Canada than they maybe having most of traffic or readers from their own country. So, I think you're well known about guest posting and what if you request blog admin for contribution and publish a guest post on these blogs? It can really help you to do blast of US and Canada traffic. So, keep engaging with these countries based blogs!

Tip 4. Submit Blog To US and Canada Directories

Directories are also useful as people are using them to find interesting content on the web. There are also some US based directories that can help you to more American and Canadian traffic. You can easily submit your blog to US and Canada based directories and I'll suggest to go for USA Listing Web Directory as there are so many directories that you can search in Google. Once you've submitted your blog on these directories than it may require approval to get placed in public. And for approval, your blog should have best well written content and rankings should also be good because it helps to get approval. Well, After being placed in some American directories, you'll get traffic if anyone is interested in your niche.

Tip 5. Advertise on Popular American Websites

In case, if you can invest some bucks to get more bucks that this tip is specially for you. Instead of hiring some experts to drive american traffic, you should advertise on popular US and Canada websites to get american blog readers. You can use BuySellAds to find popular US site and also purchasing an ad slot on that. BuySellAds is completely easy and reliable to advertise on best sites. There are even more ways to advertise like you can advertise with Google AdWords that can also help to drive US traffic. Even you can also use Facebook now to advertise your blog to american people specially. In Google AdWords and Facebook, you'll need to select location as America or Canada for the best result.

Tip 6. Set US Geographic Target in Google Webmaster Tools 

There is an additional option in Google Webmaster Tools that we can target any specific country to show our website in that target country mostly. Well, It can be formality or maybe it works but I'm not sure! Instead of missing this, I thought why not mention that here also. Here is the tutorial how can we can target US in Google webmaster tools.
  • Go To Webmaster Tools >> Site Dashboard 
  • Click Gear Icon At The Top Right Corner and Go To "Site Settings"
  • Tick The Box "Target Users in" And Choose Country "United States" or As You Like.
  • Click "Save"
  • It's Done!

Source : Bloggeryard
Read More