// //

How to change blogspot.com to dot.tk in blogger? | Art2advice

Are you publishing your blog with Blogger.com? Are you feeling that your long domain name like your-blogname.blogspot.com, giving you bad reputation at many points of view? If your answer is yes! Then you came to right place and read out my post.

Why should I change to custom domain?

Search engines except Google, rest of all will never result your blogspot well at their listing. Social networking sites don’t like your blogspot.com tag when compared with top level domain. They don’t love to back link you. Moreover, the blogspot.com domains are blocked by some Internet service providers including China. You can also get custom e-mail like admin@your-domain.com with Google Apps. So this time, I am posting step by step guide to set up a custom domain using Dot.tk.

Guide to set up a Dot Tk custom domain using free DNS service:

Registering Dot Tk Domain:

Step-I:
  1. Go to Dot.tk website.
  2. Enter your preferred Dot Tk domain name and click Go. If entered domain is available, you will be promoted for further steps.
  3. Dot Tk domain registration panel
  4. Now it shows availability of your domain.  For free domain you need to produce minimum of 25 hits per 90 days. Free domain has same services as paid domain. Select your choice and move on to next step.
  5. Dot tk sign up
  6. Enter your blogspot URL and set registration length as 12 months. Now sign up with Dot Tk. Here you have to verify your Dot Tk account by email or you can also use social Networking accounts like facebook, yahoo, flicker etc.

Dot Tk settings in Blogger:

Step-II:
  1. Log on to your blogger account.
  2. Adding custom domain
  3. Go to Settings and find Publishing option in your dashboard. Now click on Add a Custom Domain. You will be prompted to buy a domain for your blog.
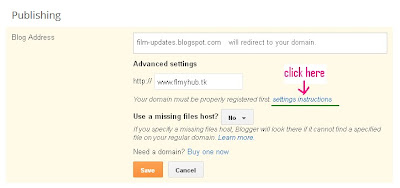
  4. Blogger custom domain settings
  5. Simply click on Switch to advanced settings. Then enter your Dot Tk domain with www in the place of www.filmyhub.tk (as shown in the picture). Now you have to verify domain ownership by adding two CNAME records. For this, click on Settings instructions. You will be landed to a page that having dynamically generated CNAME valus with detailed set up instructions.

DNS Configurations in Dot TK:

Step-III:
  1. Now log on to your Dot Tk account and click on Domain Panel. It gives the list of your Dot Tk Domains. Now, click on Modify option to configure DNS Settings for your domain.
  2. DNS settings in DOT TK
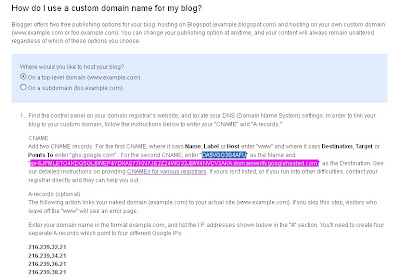
  3. Here, you will get a pop up window of Domain settings. Select Dot TK DNS Service and configure your DNS settings like above shown screenshot according to your domain name. You will find dynamically generated CNAME values in below image. 
  4. DNS settings in Blogger
  5. For the first CNAME, enter Host Name as "www" and IP address as "ghs.google.com". It is fixed for any blog. Second CNAME record needs dynamically generated values. It means Host name with dynamically generated name (which is highlighted in blue) and IP Address with dynamically generated value like "gv-xxxxx.domainverify.googlehosted.com" (which is highlighted in pink). These fields are different for different blogs. Do not forget  to select record type as CNAME record.
  6. To make your naked domain available, you have to add A record with following details. select record type as A record, then fill Host Name field with your dot tk domain without www (example: filmyhub.tk ) and IP address as 216.239.32.21
  7. Before you move onto next step, wait about 30 min or an hour for your DNS settings to activate.

Saving Custom Domain settings in Blogger:

Step-IV:
  1. Again go to advacned settings that configured in second step under publishing and save them. If you get any error, come back after some time and save settings.
  2. custom domain settings in Blogger
  3. Once you are done with saving, under publishing edit your custom domain and set redirection option by putting tick mark as shown in picture
  4. If you have any trouble in following any step, put a comment that helps me to catch you back.
Read More
// //

Fastest Adsense Approval Trick | Art2advice

I am not publishing much articles these days because I am busy in designing templates and completing the requests of my clients. Today, I have got some relief and thus publishing an important article about getting an Approved Adsense Account in 1 hour. I was getting several request, Where user asked me to provide some easiest method for getting an Approved Adsense Account.

                   Google Adsense Approval How to get an Approved Adsense Account in 1 hour?


Google Adsense is undoubtedly one of the best Ad network for bloggers and Web Masters but getting an approved adsense account was never an easy procedure. However, those days are passed and now, You can get an Approved Adsense Account in 1 hour. Isn’t that unbelievable? But it is true. In this post, I will show you “How to get an Approved Adsense Account in 1 hours?


You can get an Approved Adsense Account in 1 hours through the help of YouTube Monetization method. The whole procedure is shown below:
  • First of all, Create a New GMail Account.  If you haven’t used your Old GMail account for Monetization then you can also use your Old account as well. If your country is not supported by Adsense then choose a country like US and UK, while creating New GMail Account.
  • Login to your “YouTube” Account by visiting https://www.youtube.com/
  • Visit http://youtube.com/account_monetization
  • Enable “Monetization” for your YouTube Account. The screenshot for doing the same is given below:
21 How to get an Approved Adsense Account in 1 hour?
  • After that, You will have to “Accept” all terms and condition. The screenshot of the same is given below:
3 How to get an Approved Adsense Account in 1 hour?
  • Finally, Click on “Monetize” Button. The screenshot of the same is given below:
5 How to get an Approved Adsense Account in 1 hour?
  • After doing that, You will receive an EMail in your Inbox.
  • Now, Upload a Unique video in your YouTube Account. While doing that, Don’t forget to add appropriate description and Tags for videos. Wait for the upload to get completed. Once done, Publish it.
  • To associate an Adsense Account, Visit https://www.youtube.com/account_monetization and expand the topic “How Will I be Paid” and click on the link “Associate an Adsense Account“. The screenshot of the same is given below:
51 How to get an Approved Adsense Account in 1 hour?
  • Now, You will be redirected to a screen, Where you will have to set up your Adsense Account. Click on “Continue” button for filling your other details such as Address, Country, Payee Name etc
apply for adsense 5 How to get an Approved Adsense Account in 1 hour?
  • After clicking on “Continue” button, You will see the below given screen. Enter all details correctly.
fill adsense aplication form form 6 How to get an Approved Adsense Account in 1 hour?
  • After filling all details, Click on “Submit” button. Wait for 1-2 hours. You will get an EMail containing the details of  an Approved Adsense Account. Hurray….Hurray…enjoy.
  • Login to your Adsense Account
  • Click on “Account Settings” option on Home Page. The screenshot of the same is given below:
52 How to get an Approved Adsense Account in 1 hour?
  • Move to “Access and Authorization” section. You will find this section at the end of “Account Settings” Page.
  • Click on “Edit” link which appears next to “Only host sites are allowed to show ads for your account” option.
  • Now, Add the url of your website(where you want to show Ads) on “Show Ads on Other Website” Page. You have done most of your work.
  • Finally, Create an Ad Unit and implement the code in your website.. Enjoy.
  • If you want to display Adsense Ads on Blogger Blog, Simply Associate your Adsense Account with blogger.
The above described method for getting an Approved Adsense Account in 1 hour is the easiest one. Anyone can easily get an Approved adsense account. The method is tested and 100% working. However, Always follow the terms and condition of Adsense otherwise they will ban your accountwithout any pre-warning.
Simply Give it a try and post your comments.
Read More
// //

Get .in Domain for free | Art2advice

Hello All fans !!!!   I am back with a new article. In this article i will teach u about how to get free .in domain for freee. If you are thinking that its a joke, for your kind information I want to inform you that it is not a joke you can try this.

Limitations:---


1. You can’t edit html
2. You can’t set nameservers.
3. You edit DNS info.

Follow the Steps:-

STEP 1. Go to http://www.indiagetonline.in/.

STEP 2.  Then Click on Yes I Want a free website


STEP 3. After Clicking on Yes I want my Free Website, Scroll Down and Click on  Create my free Website now.

STEP 4.  Choose your domain and click on Continue.

STEP 5. Use http://www.fakenamegenerator.com/  To Sign Up. And when you reach to "Permanent Account Number (PAN)" enter "AAAPS8788R" but If it is not available change "8788" to anything you want like "9235" but keep it as 4 Digits.

STEP 6. Verify your domain by your email.

STEP 7. Congrats you have made your own ".in" domain!!!

Normally on name.com these domains would go for $2. So if you don’t want all these limitations, your better off buying the domain. But if your just going to make a site that doesn't require scripts or is used as something like a contact page then try the method. I've been told you can transfer this to other domain registrar’s to bypass the restrictions but I haven’t found the authorization code needed to do so.
Read More
// //

How to add your own Favicon in blogger blogs/blogspots?


Uploading favicon in blogger.
Simply you can publish your own favicon in blogger templetes. Follow carefully some steps below:
Step 1:
First of all make your favicon image that you want to publish in your blog. Then save image .png, .jpg, .jpeg. But you have to be sure your image size have to be 16×16 pixels or 32×32 pixels.
Step 2:
Now you have to convert your image .png, .jpg, .jpeg to .ico an icon file. You can convert online. Click here to convert your image into .ico file.
Step 3:
Now down load your fevicon icon in your computer.
Step 4:
Then login your blogger account in draft that is  http://draft.blogger.com/home .
  • Go to layout menu in left side . click on Layout option
  • You will see on the top left side upload your fevicon.
  • Click on upload option. Browse and choose the ico file the you’d downloaded fevicon.
  • Then click on ok and save.
  • log out your dashboard and gmail account.
  • Then restart your internet explorer.
  • open your blog you will find your beautiful fevicon.
that’s all , enjoy blogging..
Read More
// //

How to create an Apple ID without a Credit Card

This is a video tutorial about how to create an Apple ID in iTunes Account Without a Credit Card, you can create it directly in your iPhone. [Thanks my friend BABY'S MUTU for providing this precious video, which I'm going to share with you through this blog.]
As it says a credit card is required to proceed, People are getting confused when they go to create an Apple ID. (If they don’t want to purchase any application or they don’t have a valid credit card, its an irritating situation.)
But I found a secret that there is an option to choose “None” for a credit card. It will depend on how the account is created. There are two ways to create an Apple ID. One is to actually click “Create Account” in the Store menu, Which is most people try. If you go like that way, you won’t see “None” listed in the payment options. You must have a valid credit card.
BUT the second way to create apple ID is to try installing a completely free application while not signed into an account. You will get an option “None” at the end of the payment methods.
This method works in both iTunes and the Mac App Store.


Read More
// //

5 Best High Paying Adsense Alternative of 2013

                                             Advertiser and Publisher


After establishing your blog what else you look forward. The first thing grow your mind is to make money via your blog and Adsense will be first platform that you will think of it. Though some of you fail to make money from it as you expected. But getting Adsense approval is not an easy task nowadays even if you have good blog. You have to follow some tactics to get approval from the Adsense. So, if getting approved adsense is not an easy that what to do? Well! there are so many ways that you can earn via your blog, but it is difficult to choose from them that which is the best. Today I am sharing top 5 best high paying Adsense alternative of 2013.
All the programs have different criteria to approve website or blog. You also get simply approved by one of the program from below if your blog or website receives huge amount of traffic. In this post I will discuss on Adsense alternatives and their criteria to get approve your blog or website.

As we all knows that Google Adsense is most preferred program to earn money online as it has good CPC. You can also earn good amount from Google Adsense with huge traffic. The only thing is that your blog or website should receive good traffic from completely different countries with good Alexa rank and good google page rank. If your blog have all these thing that you can simply apply to below direct advertising programs.

5 HIGH PAYING ADSENSE ALTERNATIVES

Bellow are the list of most preferred adsense alternatives which pays handsome amount of cash. If you are looking to earn some more from your blog or website along with Adsense programs you can also apply for on the below site.
BuySellAds

BUYSELLADS

One of the best direct advertise program online. BuySellAds was started in 2008 and now its gains lots of credit to its bucket. It is the most trusted high amount payer to  blogger and webmasters. BuySellAds growing day by day. Plenty of individuals moving here to advertise their products on plenty of niches websites. This program allows you to set your price and your ad spot on your site. There is not limit to set price. you can simply add there advertise here page on your site to get more advertiser direct from your site.
TribalFusion

TRIBAL FUSION

It is also one of the alternative of Adsense that provides Ads on your site. Tribal Fusion one of the best ads program among top of direct advertisers. People who want to earn good amount of money also can apply to Tribal Fusion.

Bidvertiser

BIDVERTISER

Bidvertiser is an open advertising web site which offer to position ads on your site or blog. This is one of the most effective and high obtain program to similar other sites. You can also earn good amount of cash from Bidvertiser by just simply registering on it.

ADBright

ADBRITE

Adbrit also the highest advertise corporations. This program does not shows ads on your website, its just shows links or text ads on your blog or site. Publisher can easily show the links on his/her posts contents.

Media.Net

MEDIA.NET


Media.net is one of fast growing company in CPM category. It is also now partnered with Yahoo and Bing and provide contextual ads also. This becomes mos preferred adsense alternative to earn money. Earlier user only moved to Media.net if Google Adsense not approve their application. But not this becomes almost first choice of them to get advertise on their site.
Read More
// //

Download WhatsApp for PC


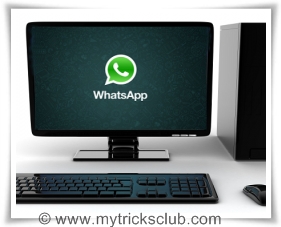
Today, I am going to post about how to download and run whatsapp on pc. We knowWhatsApp Messenger is a platform mobile messaging app which allows you to send and recieve messages, photos, videos etc, at free of cost, WhatsApp is very popular application on all mobile platforms but today i find a application which helps to running whatsapp on pc for this first you download BlueStacks.BlueStacks is application for pc which helps to run Android application like WhatsApp etc. It is also called Android emulator. You can download many applications like WhatsApp Messenger etc on the Google Play Store with the help of BlueStacks. Check out how to hide last seen features in whatsapp.

How to Running WhatsApp on PC :


Step 1) First of all, you need to download Bluestacks in PC or Mac.

  and Install it on your pc. After installing open it.


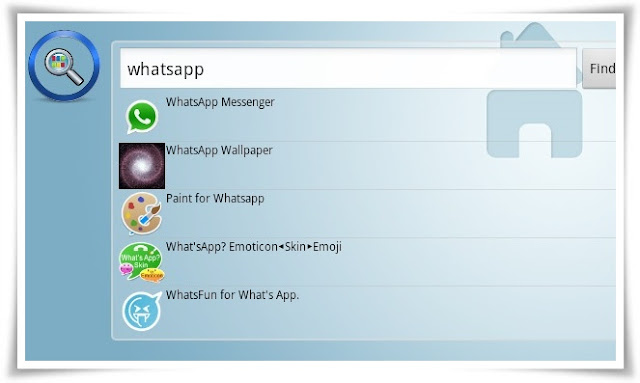
Step 2) You find a search bar at the center of this application, Now find WhatsAppMessenger.


Step 3) Click on WhatsApp Messenger and Download it.


Step 4) Now Open WhatsApp Messenger and click on Agree button and Continue.


How to Activate WhatsApp :

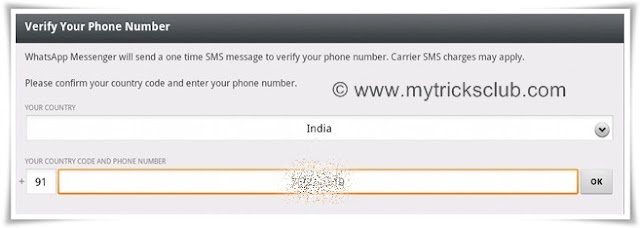
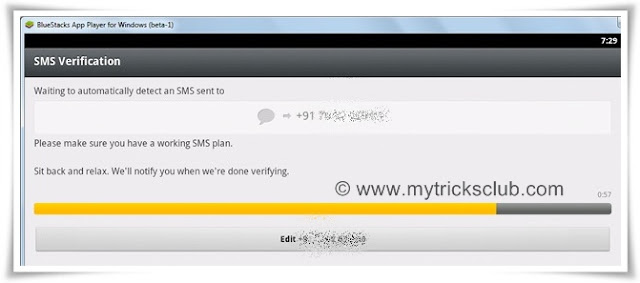
Step 1) In mobile after installing WhatsApp you need to put some information such as choose your country and mobile number, but in pc whatsapp thinks using a mobile phone and send verification SMS to your number in your inbox and your mobile number should be verified. But in case of pc choose different verification method.


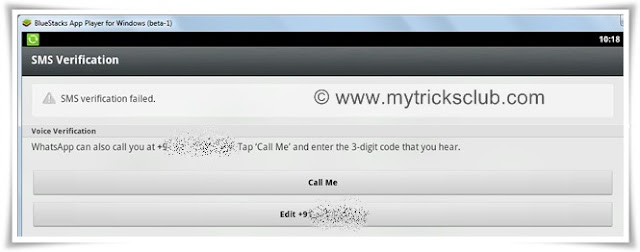
Step 2) If you activating whatsapp on your pc for this wait 5 minutes, this is a real trick we know whatsapp will wait for 5 minutes expecting the verification SMS to send on your pc, then prompt for another way for verification such as 'voice verification'.


Step 3) Waiting after 5 minutes, whatsapp will prompt for another way of verifications such as 'voice verification'. Now you will see Call Me button, click on Call Me button, then whatsapp will automatically dial your number and you hear the 3 digit verification code, remember this 3 digit verification code and enter it on whatsapp.


Step 4) Now next turn is put your name in whatsapp and hit enter.


How to Add Contacts in your WhatsApp :

Step 1) Click on Menu Bar .

Step 2) 
Then Click on Contacts

Step 3) 
 Now put your friends numbers who will running whatsapp, In this way you willAdding New Contacts

Done !
Read More